Summary
This article provides instructions on how to provide your business name and contact information, setting your business hours, and upload your company logo.
Content
In Microsoft Bookings, the business information page contains all the details that would typically be found on a business' "About us" page. These details include the business name, address, phone number, website URL, logo, and business hours.
The information provided here is displayed on the page customers use to book appointments (known as the booking page) and in messages and reminders sent to them by Bookings.

How-To
Task: To provide a business name and contact information.
Instructions
Step 1 - In Office 365, select the app launcher, and then select Bookings.
Step 2 - In the navigation pane, select Business information.
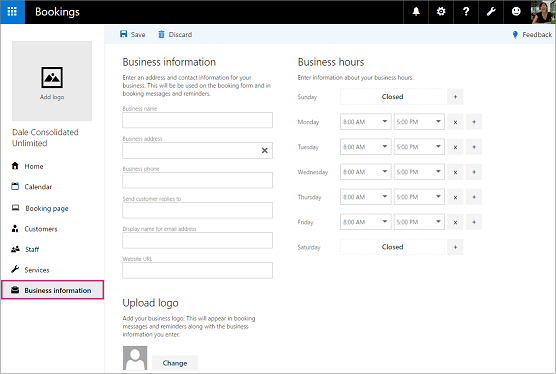
Step 3 - Enter the business name, address, and phone number.
Step 4 - In Send customer replies to, type the email address to share with customers on the booking page and where email replies to booking confirmations and reminders should be forwarded.
Step 5 - In Display name for email address, type the friendly name that should be displayed to customers in place of the email address. For example, rather than seeing seanc@contoso.com, customers could see "Contact Contoso."
Step 6 - In Website URL, enter the URL of the home page for the business.
Step 7 - Select Save.

Outcome
Contact information is added to the business information page.
Back to top
Task: To set business hours.
By default, the business hours in the Bookings app are set to 8 a.m. to 5 p.m., Monday through Friday. Times are provided in 15-minute increments. The Bookings app uses a 12-hour clock.
Instructions
Step 1 - On the Business information page, under Business hours, use the drop-downs to select start and end times for each day.
Step 2 - Click + to add start and end time selectors.
Outcome
Hours of operation are added to the business information page.
Back to top
Task: To set hours for a split shift.
Users might need to block out a portion of each day, or part of a day each week to have staff meetings, update inventory, or take care of other rhythm-of-business details. During these times, users might not want to schedule customer appointments. The Bookings app allows for that.
Assuming the business has meetings every Thursday from 1 to 2:30 and want to block out that time so all staff members can attend.
Instructions
Step 1 - On the Business information page, under Business hours, select a start and end time for Thursdays. In this example, we'll set 8:00 a.m. to 1:00 p.m.
Step 2 - Select + to create a new row for Thursday.

Step 3 - In the new row, select 2:30 p.m. for the start time and 6:00 p.m. for the end time.
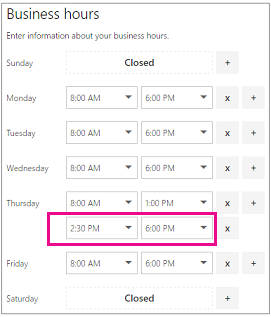
Step 4 - Select Save.
Outcome
Hours of operation for split shifts are added to the business information page.
Back to top
Task: To upload your company logo.
If you haven't already uploaded your business logo to the Bookings app, you can do it from the Business information page.
Instructions
Step 1 - On the Business information page, under Upload logo, click Change.
Step 2 - Select Upload photo.
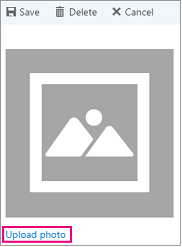
Step 3 - Select Save.
Outcome
A company logo is added to business information page.
Back to top
Further Readings
Bookings: Creating and Staffing Bookings
Bookings: Scheduling Business Closures, Time Off, and Vacation Time
Need additional help?
For additional Training please visit the Teaching & Learning Technologies Training site.
To submit a support request, please fill out the Microsoft 365 Support webform with as much detail as possible, or contact the Technology Help Desk team on your local campus. For password issues you must call or visit the Help Desk in person.