Summary
This article provides information on Creating and Managing SharePoint Groups.
Context
A SharePoint group allows collaborators to have the same set of permissions to sites and content. Rather than assign permissions individually, you can use groups to conveniently assign the same permission level to many people at once. Follow the links to the tasks you want to achieve:
How-To
Task: To create a group.
Note: To do the following steps, specific permissions to Create Groups and Manage Permissions are needed. The Full Control level has both of these permissions.
Instructions
Step 1 - On the website or team site, click Settings, and click Site permissions.
Step 2 - On the Permissions page, click Advanced Permissions Settings. The permissions page opens.
Step 3 - On the Permissions tab, click Create Group.
Step 4 - On the Create Group page, in the Name and About me boxes, type a name and description for this SharePoint group.
Step 5 - In the Owner box, specify a single owner of this security group.
Step 6 - In the Group Settings section, specify who can view and edit the membership of this group.
Step 7 - In the Membership Requests section, select the preferred settings for requests to join or leave the group. You can specify the email address to which requests should be sent.
Step 8 - In the Give Group Permissions to this Site section, choose a permission level for this group.
Step 9 - Click Create.
Outcome
Your group is created.
Back to top
Task: To add users to a group.
Note: You can add users to a group at any time.
Instructions:
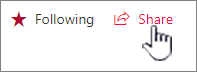
Step 1 - On the website or team site, click Share.
If you see Members instead of Share, click Members, and then click Add members.
Step 2 - By default, the Share dialog that appears displays the message Invite people to Edit or Invite people. This invites the users to join the SharePoint Members group. To choose a different group and permission level, click Show options and then choose a different SharePoint group or permission level under Select a group or permission level.
Note: As a rule always select Show Options. Uncheck send email invitation if you do not wish to send an email to all those you are adding.
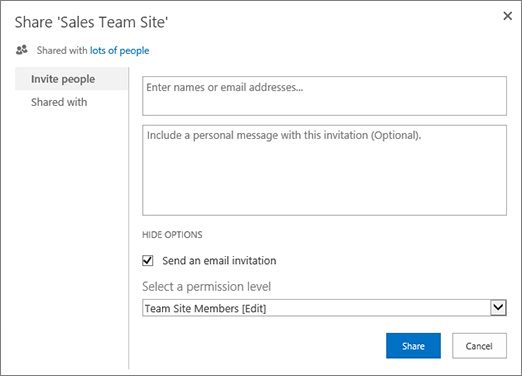
Step 3 - In the Enter names, email addresses, or Everyone box, enter the name or email address of the user or group to add. When the name appears in a confirmation box below the entry, select the name to add it to the text box.
Notes:
- DO NOT choose everyone, if you wish everyone in the USNH system to have access please put in a ticket USNH ET&S Ticketing System.
- Underneath the box of names/email addresses, there is an option to include a personal message with the invitations.
Step 4 - To add more names, repeat step 3.
Step 5 - Click Share.
Outcome
Users are added to your group.
Back to top
Task: To remove users from a group.
Instructions
Step 1 - On the website or team site, click Settings, and click Site settings. If Site settings is not listed, click Site information, and then click View all site settings.
Note: On some pages, you may need to click Site contents, then click Site settings.
Step 2 - On the Site Settings page, under Users and Permissions, click People and Groups.
Step 3 - On the People and Groups page, in the Quick Launch, click the name of the group that you want to remove users from.
Step 4 - Select the check boxes next to the users who you want to remove, click Actions, and then click Remove Users from Group.
Step 5 - In the confirmation window, click OK.
Outcome
The selected users are removed from your group.
Back to top
Task: To grant site access to a group.
Instructions
Step 1 - On the website or team site, click Settings, and click Site settings. If Site settings is not listed, click Site information, and then click View all site settings.
Note: On some pages, you may need to click Site contents, then click Site settings.
Step 2 - On the Site Settings page, under Users and Permissions, click Site Permissions.
Step 3 - On the Permissions tab, click Create Group.
Step 4 - In the Share dialog, type the name of the SharePoint group that you want to give access to.
Step 5 - By default, the Share dialog displays the message Invite people to Edit or Invite people with Can edit permissions. This grants permissions in the SharePoint Members group. To choose a different permission level, click Show options and then choose a different SharePoint group or permission level under Select a permission level or Select a group or permission level. The drop down box shows both groups and individual permission levels, like Edit or View Only.
Step 6 - Click Share.
Outcome
Permissions are assigned to the selected group.
Back to top
Task: To delete a group.
Note: DO NOT delete any of the default SharePoint groups, this can make the system unstable. Only delete group(s) you have created and no longer want to use.
Instructions
Step 1 - On the website or team site, click Settings, and click Site settings. If Site settings is not listed, click Site information, and then click View all site settings.
Note: On some pages, you may need to click Site contents, then click Site settings.
Step 2 - Under Users and Permissions, click People and Groups.
Step 3 - On the People and Groups page, click the name of the SharePoint group that you want to delete.
Step 4 - Click Settings, and then click Group Settings.
Step 5 - At the bottom of the Change Group Settings page, click Delete.
Step 6 - In the confirmation window, click OK.
Outcome
The selected group no longer has access to your site.
Back to top
Task: To assign a new permission level to a group.
If you have customized a permission level or created a new permission level, you can assign it to groups or users.
Note: Permissions for the default SharePoint groups (Owners, Members, and Visitors) for Team sites that are connected to a Microsoft 365 group can't be modified.
Instructions
Step 1 - On the website or team site, click Settings, and click Site settings. If Site settings is not listed, click Site information, and then click View all site settings.
Note: On some pages, you may need to click Site contents, then click Site settings.
Step 2 - Under Users and Permissions, click Site Permissions.
Step 3 - Select the check box next to the user or group who's permission level is changing.
Step 4 - On the Permissions tab, click Edit User Permissions.
Step 5 - On the Edit Permissions page, select the check box next to the name of the new permission level. If you select multiple permission levels, the permission level assigned to the group is the union of the individual permissions in the different levels. That is, if one level includes permissions (A, B, C), and the other level includes permissions (C, D), the new level for the group includes permissions (A, B, C, D).
Step 6 - Click OK.
Outcome
The selected group has the new permissions applied.
Back to top
Need additional help?
For additional Training please visit the Teaching & Learning Technologies Training site.
To submit a support request, please fill out the Microsoft 365 Support webform with as much detail as possible, or contact the ET&S Help Desk team on your local campus. For password issues you must call or visit the Help Desk in person.