Summary
This article provides instructions on how to request files, stop files request, and upload a requested file for SharePoint and OneDrive.
How-To
With the file request feature in OneDrive and SharePoint, you can choose a folder where others can upload files using a link that is sent to them. People you request files from can only upload files; they are unable see the content of the folder; edit, delete, or download files; or even see who else has uploaded files.
Notes: With a file request:
- Anyone with the file request link can send a file; they don't need to have OneDrive or SharePoint.
- All the files sent are saved in a single configurable folder.
- Every file will have a prefix to help identify who uploaded it.
- If two files with the same name are uploaded, OneDrive/SharePoint will automatically add a number to the name of the second file.
- People who respond to the request can only upload files. They can’t view or edit the contents of your OneDrive or SharePoint.
Task: To request files in OneDrive or SharePoint
Instructions
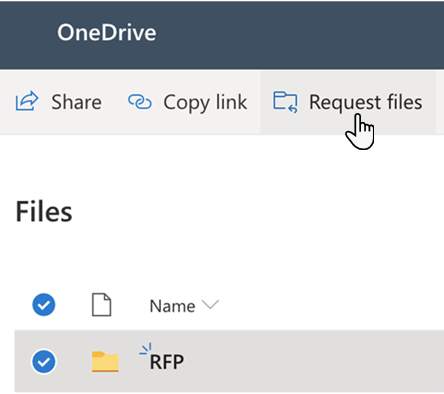
Step 1 option A (OneDrive only) - In OneDrive on the web , select the folder where you want the files to be uploaded, and then select Request files from the top ribbon.
Or
Step 1 option B (OneDrive or SharePoint) - From the OneDrive or SharePoint Web client, select the folder where you want the files to be uploaded, and then click the 3 dots that appear next to the folder name and choose request files from the fly out menu.
Note: If Request Files is not available, visit Service - Website, Mobile & SharePoint Development & Design to request that "Anyone with the link" be enabled for your SharePoint site. See more information in - Article - SharePoint: Sharing files with Anonymous links

Step 2 - Under What files are you requesting, enter a descriptive name for the files being requested from others. People will see this descriptive name when they get the file request.
Tip: To edit the descriptive name of the file request, select the folder and select Request files again, then change the name. The people you sent the request to will see the new descriptive name when they upload files.
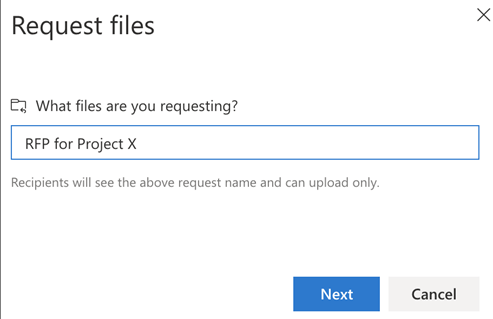
Step 3 - Select Next.
Step 4 - Select Copy link to copy the request link and send it to anyone to request files from them. Alternatively, enter the email address or addresses of the people you want to request files from. A message can also be included in the email that OneDrive/SharePoint sends to them.
Step 5 - Select Done.
Outcome
Receive a notification email whenever someone uploads files to the file request folder.
Back to top
Task: To stop requesting files.
Stop requesting files by deleting the file request link once you are finished receiving files from others. Once the link has been deleted, people with the link won’t be able to use the link to upload files to that folder anymore.
Instructions:
Step 1 - In the OneDrive or SharePoint Web client, select the file request folder.
Step 2 - Select the ellipsis (…) or three dots next to the folder name and choose Manage Access from the flyout menu.
Step 3 - Choose Links.

Step 5 - Click on the trash can to remove link.

Outcome
Requested files will no longer be received. The link deletion cannot be undone. To start collecting files in this folder again, create a new file request on the folder and send recipients a new link or email invitation.
Back to top
Task: To Upload requested files.
Anyone with the link is able to upload files to the request. However, they aren't able to see or edit other contents in the folder or see who else is able to upload files.
Notes:
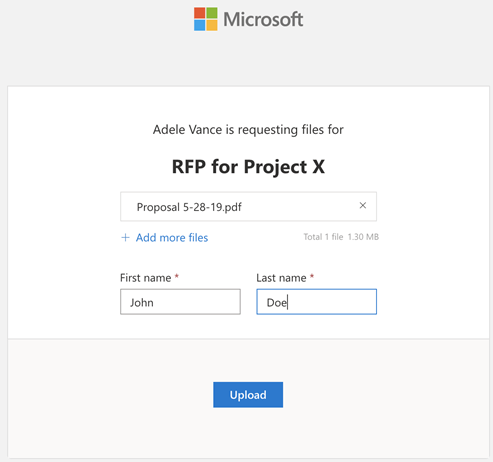
- If the recipient is not signed in, they are asked to add a first name and last name to help the requester identify the different files uploaded. The provided first name and last name is not validated; it is purely for the requester's convenience, and is not a guarantee of identity when the recipient is currently not signed in.
- If the recipient is signed in and responds to the request, the identity is recorded as part of the upload.
When recipients select the link, they'll see:

Instructions:
Step 1 - Click Select files, browse to the appropriate folder on your device, and select the file being requested. If additional files need to be added, click Add more files.
Step 2 - When all requested files have been selected, click Upload.
Outcome
Recipients get another notification once their files have been successfully uploaded. If desired, they can click Upload more to upload additional files.

Back to top
Further Readings
OneDrive: Restoring Files
OneDrive: Sharing Files/Folders
SharePoint: Sharing files with Anonymous Links
Need additional help?
For additional Training please visit the Teaching & Learning Technologies Training site.
To submit a support request, please fill out the Microsoft 365 Support webform with as much detail as possible, or contact the ET&S Help Desk team on your local campus. For password issues you must call or visit the Help Desk in person.